Website Chat Integration
Website Chat Integration
Gail can be embedded directly on your website as a chat interface, providing instant AI-powered support to your visitors. This guide walks you through the complete setup process, from creating your Gail to embedding the chat widget on your site.
Overview
Website chat integration allows you to:
- Provide 24/7 instant support to website visitors
- Answer common questions automatically
- Qualify leads and schedule appointments
- Transfer to human agents when needed
- Maintain consistent brand experience
Web chat integration uses the same Gail configuration as your voice agents, ensuring consistent responses across all channels.
Prerequisites: Create Your Gail First
Before you can embed chat on your website, you need to create and configure a Gail (AI agent). If you haven’t already created a Gail, follow these steps:
Step 1: Navigate to Gails
- Log in to your Gail portal
- Click Gails in the left-hand navigation menu
- Click Create New Gail (or Create Agent)
Step 2: Choose Your Setup Method
You have two options:
Option A: Start with a Template
Select a pre-built template that matches your use case:
Option B: Build from Scratch
Create a custom Gail tailored to your specific needs.
Step 3: Configure Your Gail
Complete the basic configuration:
Name Your Gail
Choose a name that reflects its purpose (e.g., “Website Support Agent” or “Sales Assistant”).
Write the Greeting Message
This is the first message visitors will see when they open the chat.
Example greetings:
Keep greetings brief and welcoming. Let visitors know immediately what your Gail can help with.
Add Knowledge
Upload documents, web pages, and structured data to help your Gail answer questions accurately:
- Navigate to the Knowledge section
- Upload relevant documents (PDFs, Word docs, text files)
- Add URLs to crawl web pages
- Input structured data like FAQs or product information
See Knowledge Base for detailed instructions.
Configure Voice Settings (Optional)
If your Gail will also handle voice calls, configure voice settings through the dashboard. For web chat only, you can skip this step.
Step 4: Test Your Gail
Before deploying to your website:
- Use the test interface in the dashboard
- Try asking various questions your customers might ask
- Review responses for accuracy
- Iterate on knowledge and configuration as needed
Once your Gail is configured and tested, you’re ready to embed it on your website!
Accessing Your Integration Code
Now that your Gail is ready, follow these steps to get the code needed to embed it on your website:
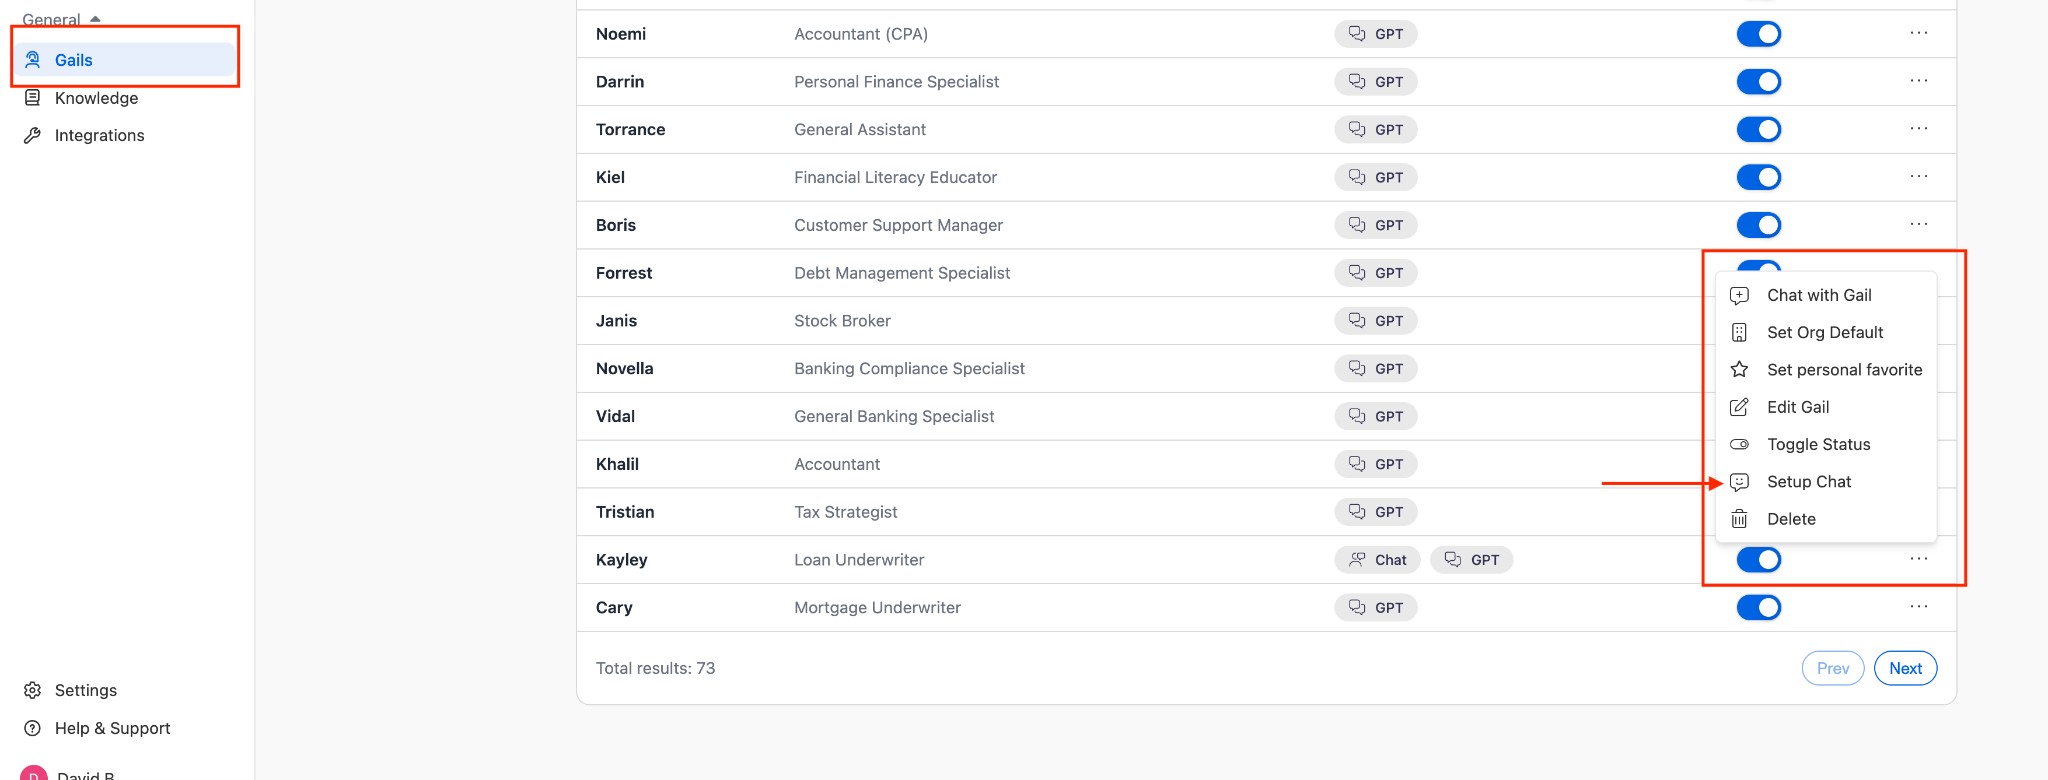
Step 1: Navigate to Gails
- Log in to the portal
- Click on the Gails tab in the left-hand sidebar
- This will display your list of active assistants
Step 2: Select Your Assistant
- Locate the specific Gail you want to integrate into your website
- Click the three dots (…) on the far right of that assistant’s row
- A dropdown menu will appear
Step 3: Open Integration Settings
From the dropdown menu, select Setup Chat.
Step 4: Access Integration Code
A “Setup Chat Integration” window will appear with everything you need to deploy your Gail:
- NPM Package: Documentation for using the
@gail-ai/conversation-embedpackage - Embeddable Frame: Code to embed the full chat interface
- Floating Widget: Code for the corner chat bubble
- IDs: Your specific Organization ID and Assistant ID
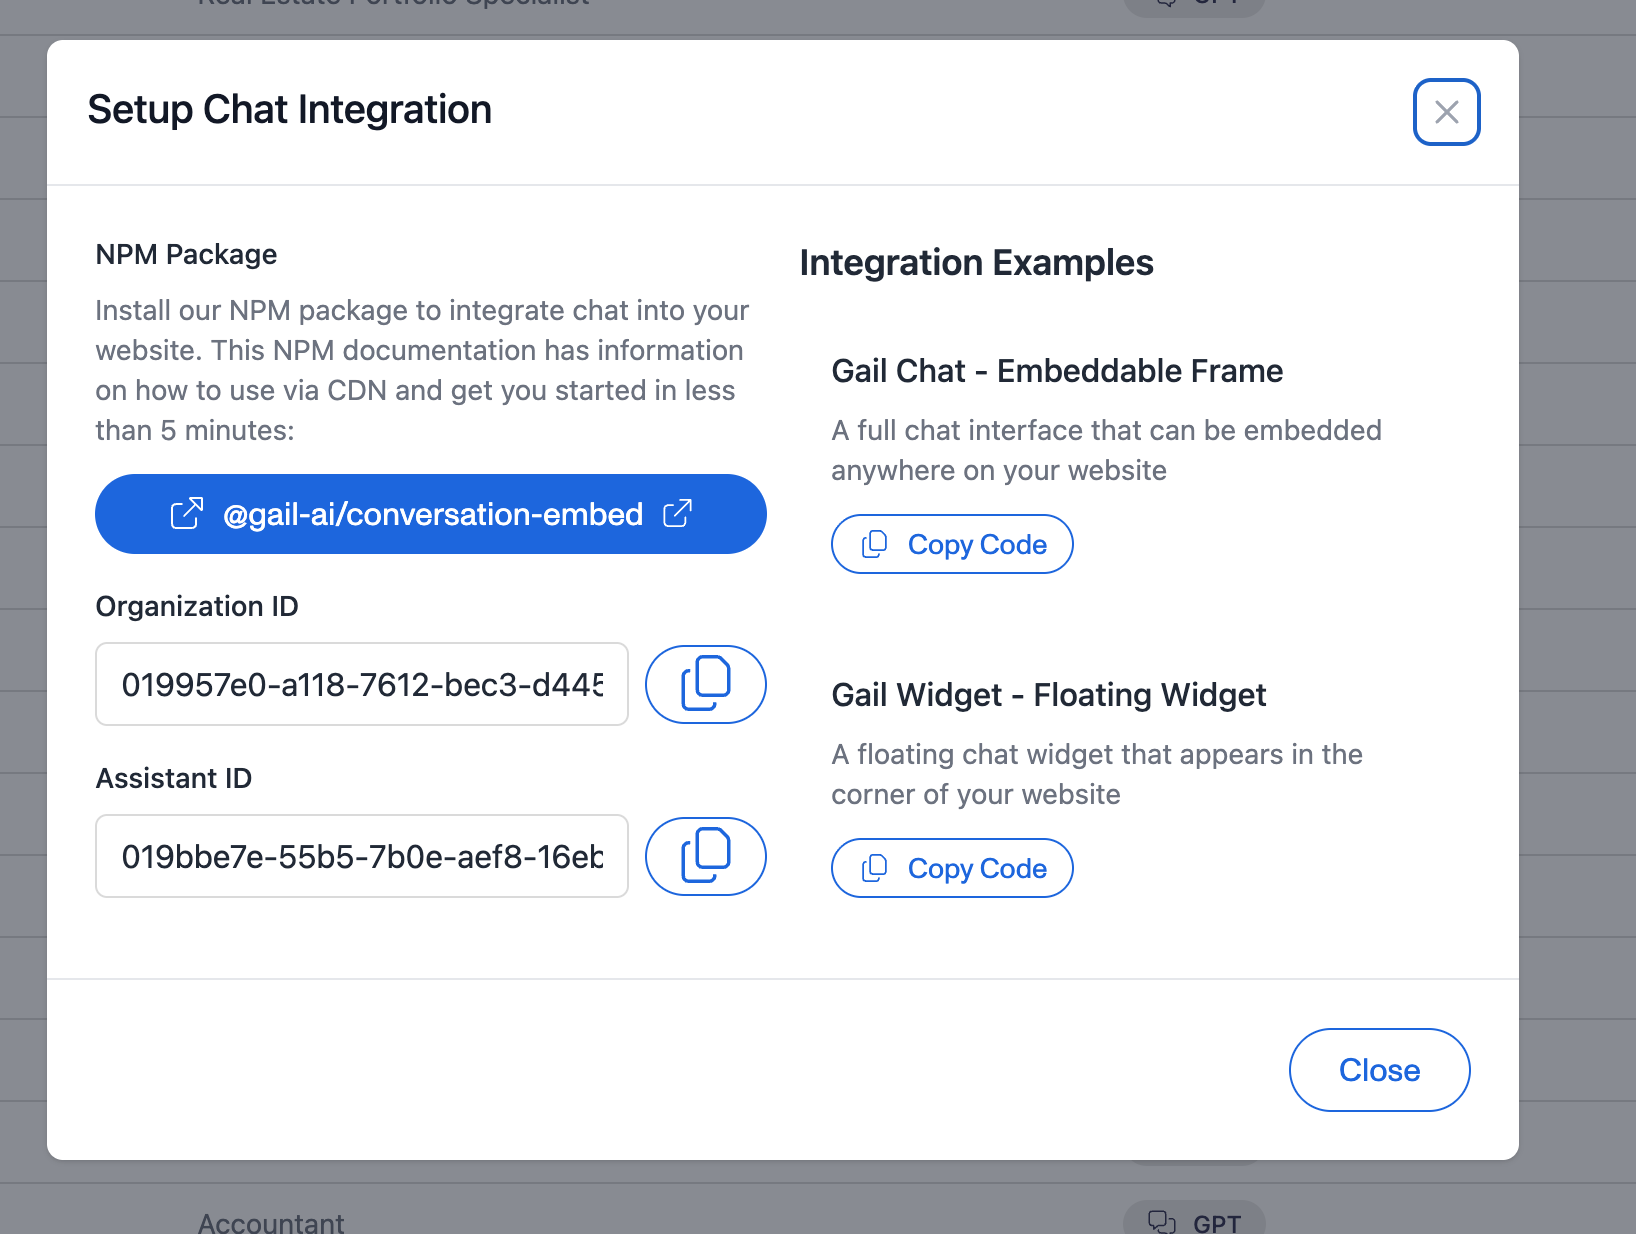
Keep this window open as you’ll need to copy code from it in the next steps.
Integration Methods
There are three ways to integrate Gail chat into your website. Choose the method that best fits your technical requirements and user experience goals.
Method 1: Floating Widget (Recommended)
The floating widget appears as a chat bubble in the corner of your website. This is the most popular option as it’s non-intrusive and familiar to users.
Best for:
- General website use
- Providing support without disrupting content
- Maintaining consistent access across all pages
Implementation Steps
- In the “Setup Chat Integration” window, click the Floating Widget tab
- Copy the provided code snippet
- Paste the code into your website’s HTML, just before the closing
</body>tag
Example code structure:
- Save and deploy your website changes
- The chat bubble will appear in the bottom-right corner of your site
Customization Options
The floating widget can typically be customized with:
- Position (bottom-right, bottom-left, etc.)
- Colors to match your brand
- Icon and bubble styling
- Welcome message timing
Refer to the NPM package documentation in your Setup Chat Integration window for specific customization options.
Method 2: Embeddable Frame
The embeddable frame allows you to place the chat interface anywhere on your page as an inline element.
Best for:
- Dedicated support or contact pages
- When you want chat to be the primary focus
- Integration into existing page layouts
Implementation Steps
- In the “Setup Chat Integration” window, click the Embeddable Frame tab
- Copy the provided iframe code or container code
- Paste the code into your HTML where you want the chat to appear
Example structure:
- Adjust the width and height to fit your design
- Save and deploy your changes
For responsive designs, consider using percentage-based widths and media queries to adapt the chat frame to different screen sizes.
Method 3: NPM Package (For Developers)
For more advanced integrations and full control, use the @gail-ai/conversation-embed NPM package.
Best for:
- React, Vue, Angular, or other JavaScript framework projects
- When you need programmatic control
- Custom UI implementations
- Advanced event handling
Implementation Steps
- In the “Setup Chat Integration” window, click the NPM Package tab
- Follow the installation instructions:
or
- Import and initialize in your application:
- Refer to the NPM package documentation in your Setup Chat Integration window for:
- Full API reference
- Configuration options
- Event handlers
- Custom styling
- Advanced features
Your Organization ID and Assistant ID are displayed in the Setup Chat Integration window. You’ll need these values for the NPM package integration.
Configuration and Customization
Branding
Match the chat interface to your brand:
- Colors: Customize primary colors, text colors, and background colors
- Logo: Add your company logo to the chat header
- Font: Match your website’s typography
- Welcome message: Customize the initial greeting
These options are typically configured through:
- The NPM package configuration object
- CSS overrides for the widget
- Settings in the Setup Chat Integration window
Behavior Settings
Configure how the chat behaves:
- Auto-open: Automatically open chat after a delay or on certain pages
- Proactive messages: Send a greeting after visitor inactivity
- Position: Change the location of the floating widget
- Availability: Show online/offline status
- Sound notifications: Enable or disable notification sounds
Language and Localization
If you serve international customers:
- Ensure your Gail is configured with appropriate language support
- Set the default language in the embed configuration
- Consider creating separate Gails for different languages
Testing Your Integration
Before going live, thoroughly test your chat integration:
Functionality Testing
- Load testing: Verify the chat loads on all pages where it’s embedded
- Conversation testing: Test various questions and scenarios
- Response accuracy: Ensure answers are accurate and helpful
- Fallback testing: Test what happens when Gail can’t answer
Cross-Browser Testing
Test the chat in multiple browsers:
- Chrome
- Firefox
- Safari
- Edge
- Mobile browsers (iOS Safari, Chrome Mobile)
Responsive Design Testing
Verify the chat works on different screen sizes:
- Desktop (1920px, 1440px, 1280px)
- Tablet (768px, 1024px)
- Mobile (375px, 414px)
Performance Testing
- Check page load times with the chat widget
- Verify it doesn’t block page rendering
- Test on slower network connections
Test on actual devices when possible, not just browser emulation, especially for mobile testing.
Going Live
Once testing is complete:
Step 1: Deploy to Production
- Add the embed code to your production website
- Deploy your changes through your normal deployment process
- Clear CDN caches if applicable
Step 2: Monitor Initial Performance
Watch for:
- Chat widget loading correctly
- Conversations starting successfully
- Response quality
- Any error messages
Step 3: Review Conversations
- Navigate to Data & Analytics in the Gail dashboard
- Review chat conversations
- Look for areas where Gail struggles
- Identify common questions not well-answered
Step 4: Iterate and Improve
Based on your review:
- Add more knowledge to address gaps
- Refine Gail’s configuration
- Update conversation flows
- Adjust use cases and scenarios
Monitoring and Analytics
Conversation Logs
Access detailed chat logs:
- Go to Data & Analytics > Call Logs (chat conversations appear here too)
- Filter by channel: Web Chat
- Review individual conversation transcripts
- Identify trends and common issues
Key Metrics to Track
Monitor these metrics to measure success:
- Chat volume: Number of chat conversations
- Resolution rate: Percentage of conversations resolved without human intervention
- Average response time: How quickly Gail responds
- Customer satisfaction: If you collect feedback
- Containment rate: Percentage of chats handled entirely by Gail
- Transfer rate: How often Gail transfers to a human
Continuous Improvement
Use analytics to improve your chat experience:
- Weekly reviews: Check conversation logs weekly
- Knowledge updates: Add information for frequently asked questions
- Configuration adjustments: Refine Gail’s behavior based on real usage
- A/B testing: Test different greetings, positions, or configurations
Troubleshooting
Chat Widget Not Appearing
If the chat widget doesn’t load:
Check code placement
- Ensure the code is placed before the closing
</body>tag - Verify there are no JavaScript errors in the browser console
- Check that the code was copied completely
Verify IDs
- Confirm Organization ID is correct
- Confirm Assistant ID is correct
- Check for typos in the integration code
Check browser console
- Open browser developer tools (F12)
- Look for error messages in the console
- Address any JavaScript errors
Chat Not Responding
If the chat widget appears but doesn’t respond:
Check Gail status
- Verify your Gail is active in the dashboard
- Confirm it hasn’t been paused or disabled
- Check that knowledge base is properly configured
Review configuration
- Ensure your Gail has sufficient knowledge
- Verify conversation flows are set up correctly
- Check that there are no configuration errors
Check network connectivity
- Use browser developer tools to check network requests
- Look for failed API calls
- Verify there are no CORS errors
Styling Issues
If the chat widget looks broken or doesn’t match your design:
CSS conflicts
- Check for CSS conflicts with your website styles
- Use browser developer tools to inspect element styles
- Add CSS overrides if needed
Responsive issues
- Test on actual devices
- Check media queries
- Adjust container dimensions
Z-index problems
- Ensure the chat widget appears above other elements
- Adjust z-index values if necessary
Performance Issues
If the chat widget slows down your page:
Optimize loading
- Ensure the widget loads asynchronously
- Consider lazy loading on certain pages
- Check that it doesn’t block page rendering
Reduce bundle size
- Use the CDN version instead of bundling (if applicable)
- Implement code splitting for NPM package integration
- Remove unused features or customizations
Best Practices
User Experience
- Clear availability: Let users know if they’re chatting with AI or when human handoff is available
- Set expectations: Be clear about what your Gail can and cannot help with
- Provide alternatives: Offer phone numbers or email if chat can’t resolve the issue
- Mobile-first: Ensure excellent mobile experience as many users chat from phones
Content and Knowledge
- Regular updates: Keep your Gail’s knowledge base current
- FAQs first: Ensure all frequently asked questions are covered
- Clear language: Use simple, clear language in responses
- Consistent tone: Match your brand’s voice and tone
Technical
- Async loading: Load the chat widget asynchronously to avoid blocking page load
- Error handling: Implement proper error handling and fallbacks
- Privacy compliance: Ensure compliance with GDPR, CCPA, and other privacy regulations
- Accessibility: Make sure the chat widget is accessible (keyboard navigation, screen readers)
Monitoring
- Regular reviews: Review chat conversations weekly
- Track metrics: Monitor key performance indicators
- User feedback: Collect feedback on chat experience
- Continuous improvement: Regularly update based on usage patterns
Security and Privacy
Data Protection
- All chat conversations are encrypted in transit
- Data is stored securely in compliance with industry standards
- Review your organization’s data retention policies
Compliance Considerations
Ensure your chat implementation complies with:
- GDPR: If serving EU visitors
- CCPA: If serving California residents
- HIPAA: If handling healthcare information (special configuration required)
- PCI DSS: If collecting payment information (not recommended through chat)
User Consent
Consider adding:
- Chat terms of service
- Privacy policy links in the chat interface
- Cookie consent if required by your jurisdiction
- Data collection notices
Advanced Features
Transferring to Human Agents
Configure your Gail to transfer complex issues to human agents:
- Set up transfer rules in your Gail configuration
- Integrate with your help desk or support system
- Define conditions for when transfer should occur
Configure transfer settings in your Gail’s dashboard settings.
Integration with Other Tools
Connect your web chat to:
- CRM systems: Salesforce, HubSpot, etc.
- Help desk software: Zendesk, Freshdesk, etc.
- Calendars: For appointment booking
- Custom APIs: For specific business logic
See Integrations Overview for available integrations.
Custom Webhooks
Trigger external actions based on chat events:
- Configure webhooks in your Gail settings
- Receive events when chats start, end, or trigger specific conditions
- Process events in your backend systems
See Custom Webhooks for implementation details.
Examples
Example 1: E-Commerce Support Chat
Use Case: Online store providing product support
Gail Configuration:
- Name: “Shopping Assistant”
- Knowledge: Product catalog, shipping policies, return policies
- Greeting: “Hi! I can help you find products, track orders, or answer questions about shipping and returns. What can I help with?”
Widget Settings:
- Position: Bottom-right floating widget
- Auto-open: After 15 seconds on product pages
- Color: Match brand primary color
Example 2: SaaS Company Help Chat
Use Case: Software company providing technical support
Gail Configuration:
- Name: “Support Assistant”
- Knowledge: Documentation, API reference, common troubleshooting guides
- Greeting: “Welcome! I can help you with account questions, technical issues, or billing. What do you need help with?”
Widget Settings:
- Position: Bottom-right floating widget
- Show only on: Dashboard and documentation pages
- Transfer rules: Complex technical issues → human agent
Example 3: Healthcare Appointment Booking
Use Case: Medical practice for appointment scheduling
Gail Configuration:
- Name: “Appointment Assistant”
- Knowledge: Provider schedules, services offered, insurance information
- Greeting: “Hello! I can help you schedule an appointment or answer questions about our services. How can I assist you?”
Widget Settings:
- Embedded frame on dedicated “Book Appointment” page
- Full-width layout
- Calendar integration enabled
- HIPAA-compliant configuration
Related Resources
- Create Your First Gail - Detailed Gail creation guide
- Knowledge Base - Build your knowledge base
- Use Cases - Design conversation paths
- Custom Webhooks - Integrate with external systems
- Call Logs - Monitor chat conversations and performance
Support
Need help with your web chat integration?
- Documentation: Search our docs for specific topics
- Support team: Contact support through your dashboard
- Technical issues: Report bugs or technical problems
- Feature requests: Share ideas for improving web chat
Your web chat is now live! Remember to monitor conversations regularly and continuously improve your Gail’s knowledge and configuration based on real user interactions.